
As I’ve mentioned in some of my other posts on using the UrbanCode Designer to design HOT documents, one of the key benefits is the significant productivity gain in not having to hand code a lot of the “tedious” Heat constructs, not having to remember resource names when hooking them up together, not worrying about YAML indentation and validation. Every new version adds more of these features which you can find in the Knowledge Centre or on Youtube (search for UrbanCode Deploy with Patterns” ).
One of the other major benefits that UrbanCode Designer is the idea of “cloud portability” : the ability to design blueprints that are “cloud agnostic”.
If you look a little harder at the “Development” environment depicted in my previous post ” Deploying IBM MobileFirst Platform with UCD” you will notice that the name of the network is “reference-network”.

Here’s another blueprint that deploys a load-balanced WordPress site with a multi-master MySQL backend.

I use a “reference_<>network” for each of the networks. Looking at the source of one of the server resources in the blueprint shows following:
referenced-image:
type: OS::Nova::Server
properties:
networks:
– port: { get_resource: referenced-image_reference-network_port }
flavor: { get_param: flavor }
image: { get_param: image }
key_name: { get_param: key_name } # Name of key-pair to be used for compute instance
Notice again the “referenced-image” and also the (automatically generated) use of a parameter to get the image (CentOS, Ubuntu etc. ..).
With the above examples the idea behind the “reference” type should be fairly obvious: remove hard-coded network names and image IDs and have them specified when provisioning an environment. Throw in the ability to easily externalize such parameters into configuration files and you have the ability to keep the blueprint “golden”: getting the blueprint to use an Ubuntu image in development and RedHat in QA or one network in development and another in production is easy requiring no change to the blueprint itself.
“So what” I hear someone say “this is just HOT parameters at work”. But wait there’s more! Here’s what UCD allows you to do with this: take the same blueprint and provision it to *any* supported cloud provider – OpenStack, Amazon EC2, VMware vCenter, SoftLayer, with (almost) no change.
I’ll repeat that in slightly different words: take the same HOT document and provision the resources on multiple, heterogeneous clouds. How does this work? After all Heat is essentially an OpenStack-only concept (with roots in AWS CloudFormation) right? The key enabler of this cloud portability is the Resource plugin support in Heat. UCD adds a whole bunch of Types for each cloud provider (documented here in the Knowledge Center). So at provisioning time the UCD-extended Heat engine uses the connection information for the selected cloud provider to “translate” the resources into the appropriate types and create the resources.
So here’s a quick example of creating a blueprint that starts off in OpenStack world and is deployed to AWS and SoftLayer.
To start with I’m connected to a OpenStack cloud provider and I drag and drop a referenced network resource onto the diagram view and change its key to suit it’s intended use, in this case an internal, private network.

Next I add a compute resource by dragging and dropping a Referenced Image onto the diagram and change its key value as well.

A quick visit to the Source view shows the OS::Nova::Server resource plus parameters for the image, flavour, SSH key and availability zone have been created. (Remember that I can change anything in the source and it will be reflected in the diagram and vice versa).

Switching back to the diagram view I connect the “dbserver” to the “private network” – drag and drop dbserver onto the network or use the connector arrow from the network.

I also want a pre-defined security group assigned to the server so I drag and drop a Referenced Security Group to the compute resource.

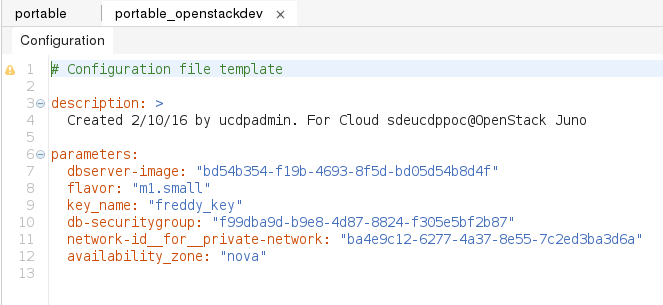
To provision this simple blueprint to my OpenStack provider I only need to click Provision, provide values for the various parameters and click Provision, creating a Configuration file – not strictly required for OpenStack clouds – along the way to save the values.

The Designer’s Environment view shows the creation of the resources and I can verify these resources via the OpenStack Horizon console.


So now I want to provision the same blueprint to AWS EC2. First I switch my current cloud provider to AWS via the CLOUDS menu.

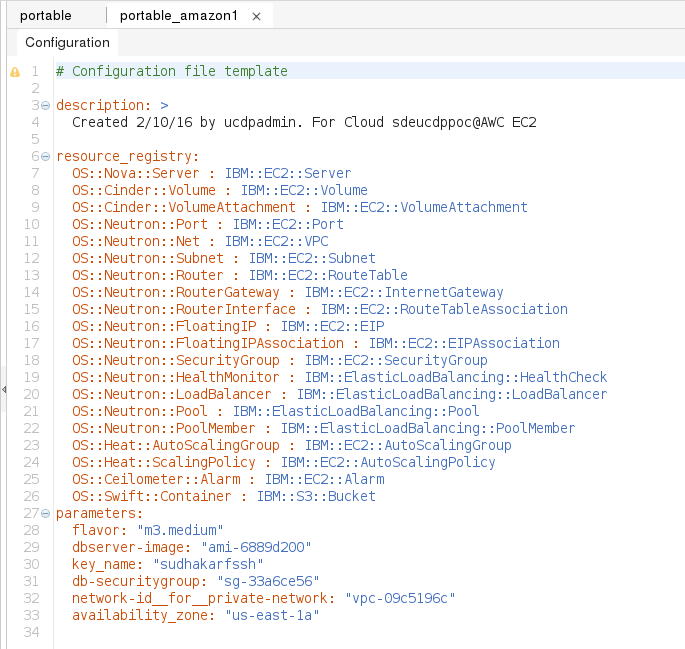
Then I click Provision and create a new configuration file for Amazon, provide values for the various parameters as before, this time picking values pulled from AWS.

As with OpenStack, the provisioning completes and I can see the server up and running in the EC2 management console.


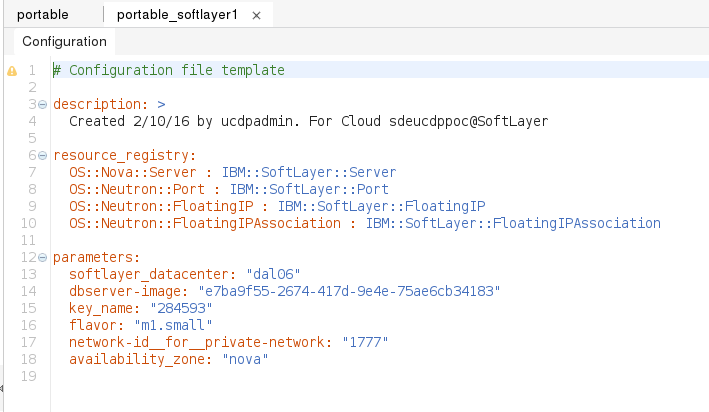
Finally to provision the blueprint to Softlayer, I switch the current cloud provider to SoftLayer, click Provision, create a configuration file and provide values for the various parameters.


And presto..well, not quite: the provision fails with an error:

I need to edit the blueprint to include a property for the server that tells SoftLayer which data center to provision to. I do this in the source adding metadata to the server resource. (Note that to save having to type this in manually, I could have created the initial Referenced Image resource with the SoftLayer cloud provider selected and this property would have been automatically added.)

Now the provision works as expected, after picking the appropriate data centre.


So I’ve taken the same blueprint and with one small change provisioned it to OpenStack, AWS and SoftLayer. A few points to note.
- The Configuration File
The Configuration File (or Heat Environment File), together with the UCD heat extensions, is what allows this cloud portability. When deploying to OpenStack, it only has a parameters section.
For any cloud other that OpenStack the Designer also adds the resource_registry section, mapping the OpenStack resource types to the UCD provided resource types for Amazon or SoftLayer (or VMWare).
- All clouds are not equal
To state the obvious, as the data centre “incident” when deploying to SoftLayer shows, each cloud provider does some things differently (or not at all). Other than Designer validation during provisioning, the Knowledge Centre is the place to look for such differences. For example, since the OpenStack OS::Nova::Server maps to the IBM::SoftLayer::Server has the custom properties supported by the SoftLayer custom type. Similarly the IBM::EC2::Server type lists the custom properties for EC2 servers.


This post should provide some idea of how to get started with designing cloud agnostic, portable blueprints with UrbanCode Designer. Keep in mind that the support in Designer varies by cloud provider and parity increases with maturity. Also keep in mind that some things in some clouds just will not have an equivalent in other clouds, so the more special, cloud specific services are used, the less portable the blueprint becomes.

I was wondering how to make the template to be more portable. This article surely helped much !